Monday

Random Reflections quilt block tutorial

Random Reflections was posted free on Moda Bake Shop's blog and I love the design possibilities and the ease of the sewing on this block.

I cut strips 1 1/2" of different scraps and of solid white material.

I constructed it two different ways - the one way is to do one block at a time by sewing a scrap strip to a white strip - the second was is to make the strips longer and sew a white strip on each end of the scrap strip - and then  cut down the middle and you have made 2 blocks at one time.  

Both methods go together very quickly.

You then sew 6 of the strips together and trim to 6 1/2" square

Here are some of the combinations you can lay them out

This one would make a great bookshelf style quilt


Wednesday

99 Modern Quilt Blocks - Megan's Star Tutorial

Lauralei's (Megan's) Star Tutorial


here are the cutting instructions:

Center
4 3/4" x 4 3/4" fussy cut on the diagonal

Center triangles
cut 2 squares 4" - cut on the diagonal to make 4 triangles

Star points
cut 8 squares 2 1/2"

Bacground
cut 4 rectangles 1 1/2" x 3 1/2 "
cut 8 rectangles 3 1/2" x 4 1/2 "

Corner triangles
cut 4 squares 2 1/2"

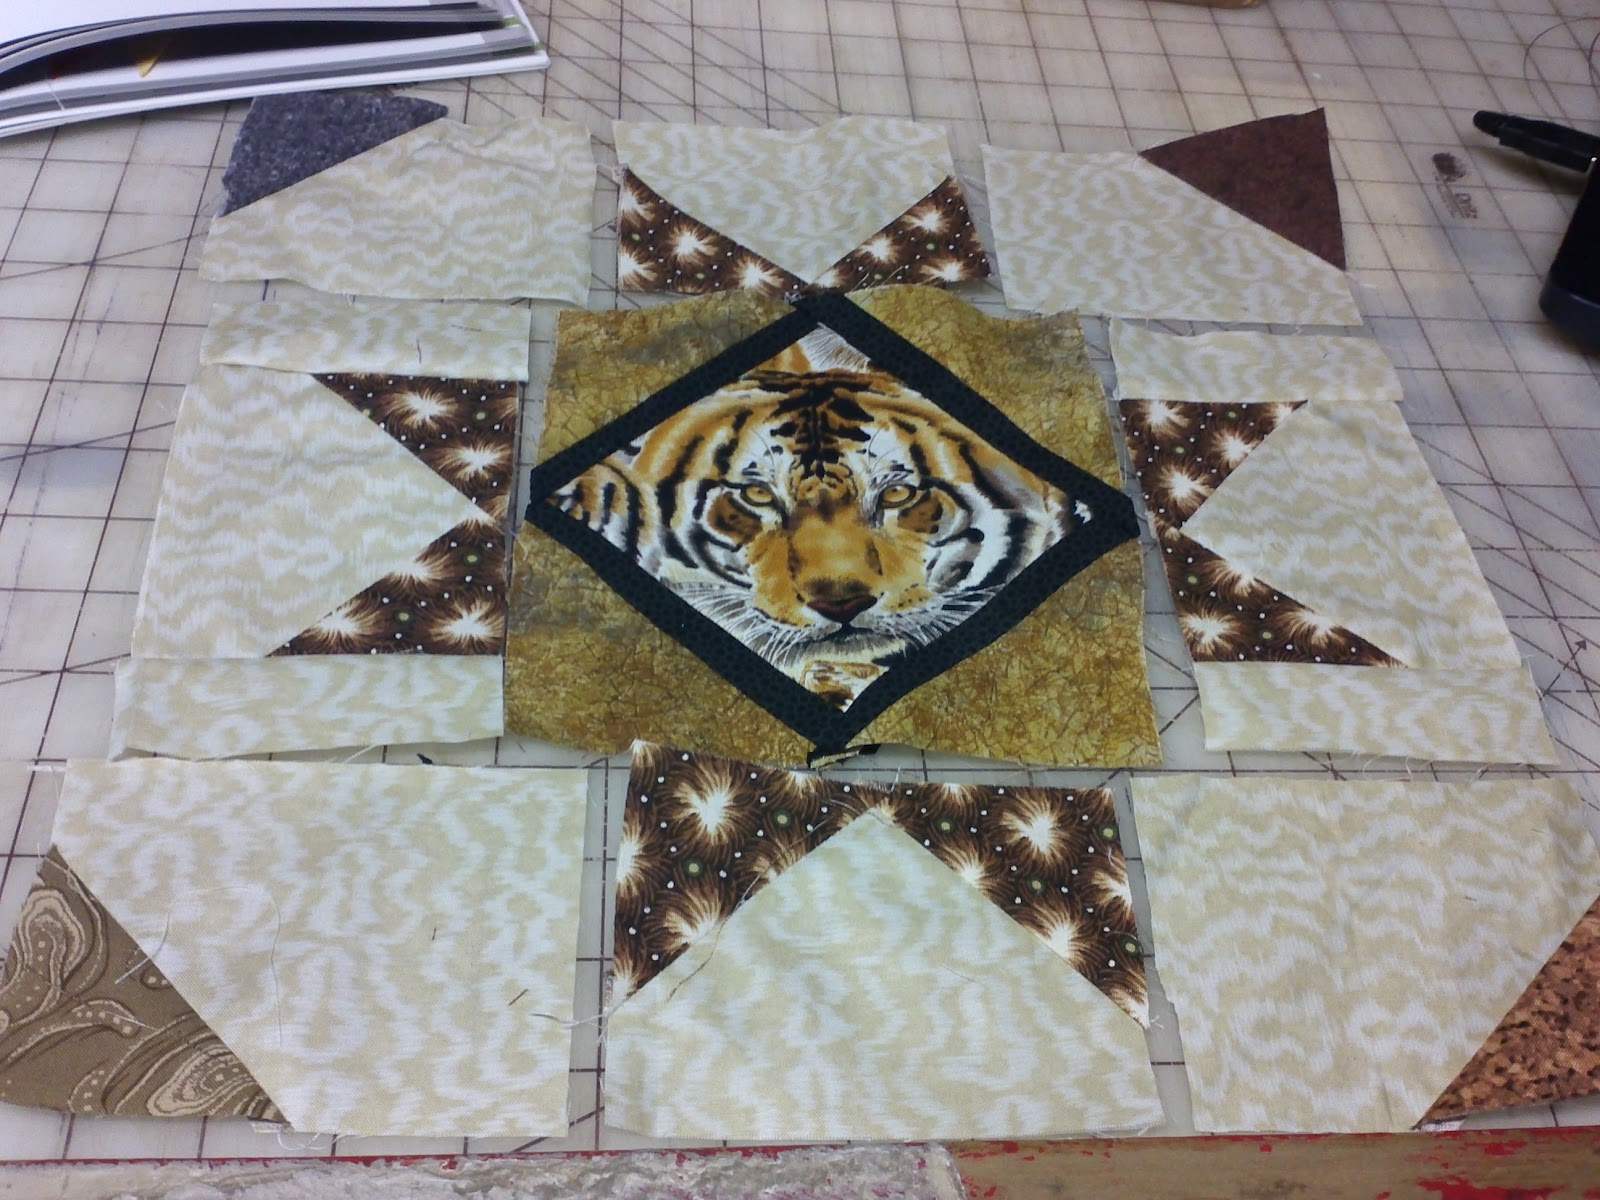
I chose to do a fussy cut on the diagonal for the center block

I also added the (optional) black strip to make the tiger stand out more.
sew triangles to the center block

right sides together, put a star square on corner of 3 1/2" x 4 1/2 " rectangle
You can draw a line on the diagonal or I just sewed across without the line by lining
up with a line on my machine plate


trim corner excess fabric


sew other corners till you have 4 sections 
** for the 4 corner triangles on the other 3 1/2" x 4 1/2 " rectangles
make sure you do 2 on one side and 2 on the opposite 
I lined them up so that faced the correct direction when you lay them out

sew the small strip to both side of the star rectangles


lay out all the pieces


Tuesday

Diamond Ripples Quilt Block Tutorial

Diamond Ripples Quilt Block Tutorial
from the book 99 Quilt Blocks - Modern Blocks
by Susanne Woods


This makes a 12.5" unfinished block

Cut 18 - 3" squares from background fabric (book says 2 7/8")
Cut 3 - 3' squares from 6 different fabrics - total of 18 squares


Draw a diagonal line on the wrong side of each background square.
With right sides together sew on both sides of the line - in one continuous line - do one side and the without cutting threads, do the other side - it makes one big circle and goes pretty fast this way

cut on the draw line in between your stitching


arrange the blocks near your sewing machine


I started on one side and flipped a block onto the block on the side of it and kept them in order and went down the line - or you could sew one by one - just keep them in the correct order


I sewed each column leaving the threads attached to maintain the correct order.
Then sewed the top two together, middle two, bottom two.
Then sewed top to middle, middle to bottom, etc

The I sewed the rows together.

other examples I found


Sunday

Wonky Star Quilt Block Tutorial


Cut 13 squares of fabric each cut 4.5" square.
       8 will be for the background         
       4 any color or pattern you choose for the star points - or all  different for a scrappy effect    
       1 any color or pattern you choose for  the center of the star     

Stack the 4 star point squares and slice in half diagonally

Select 4 of the background squares and 4 of the star point triangles.  


Stitch one triangle to the right side of each background square. Changing the angle of the triangles will help create the wonkiness of the star. 
      

Press - cut off excess background fabric on corner.


Sew the remaining 4 triangles to the left side of these 4 background blocks.


press
Cut off all excess fabric on corners - trim  to make 4.5" square.


stitch a completed star point square to both the left and right side as shown 


sew a plain background square to both the left and right sides to the star point squares


Line up the seams, stitch the top row to the middle row. Repeat with the bottom row.


This technique was first devised by Gwen Marston and shown in her  book Liberated Quiltmaking.  I also saw it in Modern Blocks: 99 Quilt Blocks from Your Favorite Designers by Susanne Woods

Be sure to join up in the Flickr group here:  Happy Scrap Quilt block Swap

Monday

Happy Scrap Quilt Block Swap

Join us as we swap quilt blocks.

The first block in the swap is this fun scrappy arrow block.

This group is an ongoing swap to trade scrappy blocks. Each swap with give you the specifics and a tutorial on how to make the block.

You can make as many or as few blocks as you wish as long as they are in multiples of 4.

You will mail your blocks to the coordinator who will divide and disperse them back to you.

Include a SASE (self addressed stamped envelope with $4.95 if in the US) PLUS one donation block for the coordinator as a thank you.

This group is OPEN to all and very flexible in structure. You can chose which swaps to participate in. Just send in the blocks by the deadline and wait for your varieties of blocks in return.

Join up in the Flickr group here:  Happy Scrap Quilt block Swap

Here is the Tutorial for making the block


1) Cut:
1 - 4 1/2" square from Fabric A (this makes the arrow)
2 - 4 1/2 " x 2 1/2 " strips from Fabric A


1 - 2 1/2" square from Fabric B


2 - 2 1/2 " squares from the solid white background fabric


2)  Place white square in corner of the large fabric A square - sew diagonally from corner to corner 


3)  Trim the seam allowance from both the white fabric and fabric A to 1/4" to reduce bulk


Repeat this process for the opposite corner.


4)  With right sides together sew the large square from fabric A with the 2 white corners to one of the strips from fabric A -
be sure to note which side to place the strip from the picture


sew other strip to fabric B square


With right sides together sew the 2 remaining pieces together being careful to match the seams.
This is the block to send in the swap - just the single arrow - Happy scrapping :)
here is a video tutorial as well


Be sure to join up in the Flickr group here:  Happy Scrap Quilt block Swap

Friday

The Power of the Mind

Everyone has heard examples of people using the power of the mind to achieve great feats.  People have been cured of disease aided by the power of their mind.  The mind has been known to be able to manipulate inanimate objects through telepathy.

Your mind can also be the cause of many illnesses. Most of us think of ulcers and other intestinal problems when we think of stress related maladies.  But you mindset can be the catalyst for almost any disease or illness.

Happiness is a choice and your mind is the biggest factor in determining your happiness level.  How a person perceives the world around them is based on their thought processes when dealing with issues that arise.  We all have problems but there is a huge variance in individual perception of the same occurrences.

Blogging as therapy - Old friends

Ultimate Blog Party 2010


Blogging can be therapy. Sometimes I don't know what I am feeling until I am actually blogging about it.

For example, have you ever lost touch with a dear friend? You think about that person and imagine how great it would be when you reconnected. I recently had that happen. I found an old dear friend after almost 20 years. I was so excited because we were so close. We talked for an hour on the phone and it was great. There have been a few emails and online chats, but I don't seem to be getting the same enthusiasm in return.

I bring up the special moments we shared and she doesn't even remember us being at the place, to say nothing of the special moment. It is such a let down, that at times I wish it was still just a wish to hope for.